Работы студентов фотошколы

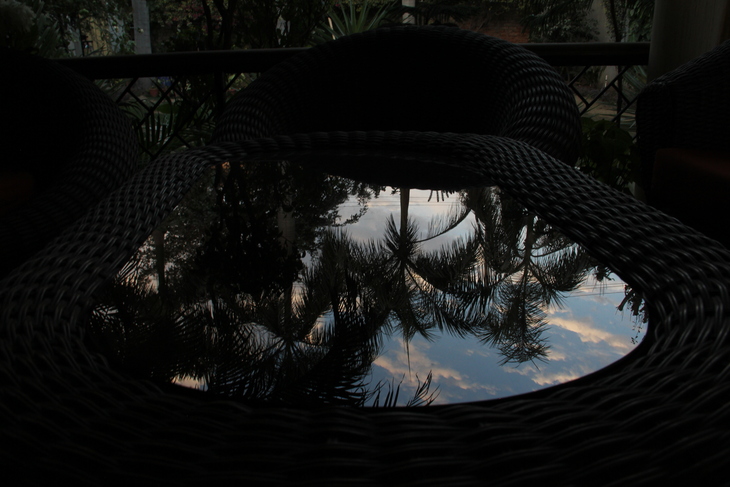
I started this assignment by trying to take pictures of the sky, pointing the camera up and all. But when I saw the reflection of the sky on the glass table, I found it to be a more interesting perspective to take a picture of the sky while pointing the camera down. Kept the shutter speed at 30 and aperture at 11 purposefully to keep the surroundings dark and place emphasis on the sky and to increase the contrast. I feel there's a lot to learn about how to play with the aperture, ISO and shutter speed. Right I am just trying the hit and trial method with different settings and seeing what results it produces. Not sure about how satisfied I am with the picture because I don't know how to judge it but I am happy with the idea that i was trying to capture here.
 Константин Воронов,
преподаватель
Hello, Oliviya!
Оценка работы
Photographing reflections - what a great idea! You are very observant - the reflection is very beautiful and interesting. We see silhouettes of palm trees set against a beautiful sky.
I can see the conscious creative effort that you’ve put into this shot.
Замечания и рекомендации
You’re right - it is difficult at first to assess your own photos because you’re not sure of the criteria to assess them by. I would suggest a simple system you can use to help you assess the technical quality of your work. We can try analysing your photo using three criteria:
- Sharpness
- Brightness
- Accuracy of color rendering
The image is sharp. This was aided by accurate focus and wide depth of field, which was achieved by closing the aperture to F11.
The color rendering is also very accurate - the colors are juicy and realistic. The setting that deals with color is called “white balance” - usually the camera manages this automatically and it almost always does this correctly.
But there are some issues with the brightness. The image is a little dark. The surrounding details - the table and chair in the background - are almost black. And yet they do have a role to play in your narrative! It’s thanks to them that the viewer is able to see what’s happening in the photo, that this is a reflection in a glass table as opposed to something else. What’s more, both the chair and armchair are very beautiful as far as I can see.
I’d advise you to make the whole picture a little brighter. So that the details on the table and chair are better defined.
So how do you make the image brighter when shooting in M mode? You have three options: increase the shutter speed, widen the aperture, or increase the ISO. It’s probably not worth extending the shutter speed in this case. At shutter speeds lower than 1/60s, you can quite easily get a blurred image from camera shake; we also don’t want to widen the aperture, or else we'll lose that depth of field, but why not raise the ISO? If you raise it to 400, you'll get a brighter picture.
Выводы
We are at the introductory lesson. And we’re only just beginning to get acquainted with the DSLR. For now we need to understand the basic principles of how the camera works, but in the next lesson we'll start getting into the settings in real detail. So I accept this picture as it is - it’s an excellent photographic experiment! You've found a perfect subject. I’m sure, too, that you’re going to impress us with plenty of interesting shots in the future! And adjusting the exposure and other settings is definitely something we’re going to be learning about in later lessons.
I’ll accept this photo, and wish you luck in your further training!
Дополнительные материалы
We are at the introductory lesson. And we’re only just beginning to get acquainted with the DSLR. For now we need to understand the basic principles of how the camera works, but in the next lesson we'll start getting into the settings in real detail. So I accept this picture as it is - it’s an excellent photographic experiment! You've found a perfect subject. I’m sure, too, that you’re going to impress us with plenty of interesting shots in the future! And adjusting the exposure and other settings is definitely something we’re going to be learning about in later lessons.
I’ll accept this photo, and wish you luck in your further training!
To measure the brightness of your shot it helps a lot if you use the histogram. You can bring this up on the camera’s screen using the “info” button, but you can also look at it using a number of computer programs. The histogram is easy to read - the main principle when you’re assessing brightness is: if the graph ‘creeps’ over to the left, then the image is probably going to be too dark. If it goes to the right then it’s the opposite - it will probably be too bright:
http://www.digital-slr-guide.com/how-to-read-a-histogram.html
https://luminous-landscape.com/understanding-histograms/